Showing posts with label eye-catching. Show all posts

Friday, 18 August 2017

How To Create A Contact Form on Blogger/Wordpress ~ mkniit ~ gniitsolution ~ gniit solution

Every blog or website needs a contact form and this easy method, using Google Docs will work on any platform, be it Blogger, Wordpress or whatever you use.
In simple terms a contact form is the best way to get connected with your readers which facilitates them to get connected with you and post their comments regarding what they feel about your blog or something else they want to share with you. An interesting feature of contact form is that it is helpful in increasing fame of your blog, which can be witnessed from comments received on your blog. 
The more visitors your site gets, the more likely it is that you’ll encounter people who’ll be leaving comments or asking questions in the comment section of your post that completely have nothing to do with the subject at hand.

Basics things in a Contact Form: 
According to me every form should have some common information which is to be provided by every person who is  filling that form. Keeping that point in mind I decided to create a contact form with three necessary things, i.e., Name, Email Address and Message.

Creating a contact Form with Google Docs: 

That is why it is always good idea to have a page dedicated to those kinds of reader feedback such as a ‘Contact Page’ or ‘Contact Form’. The process if fairly simple and doesn’t require you to have any solid knowledge in programming, and believe it or not, we will also be using Google Drive (formerly known as Google Docs) to accomplish this.
Step 1: Create the Contact Form 
  • Go to Google Docs -->                     
  • Click CREATE     
  • Click Form                                                                                                                                                                                                                                                                                                                                                                                                       
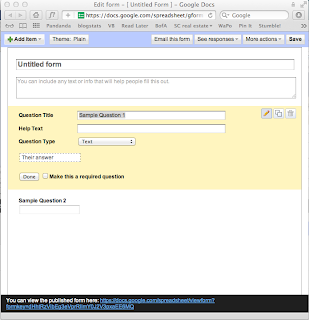
  •  You will get this screen:
  • You can give a name for this form, like "Contact Me" or "Contact Us"
  • Create questions, which will be the fields in the form. The four basic questions are: Name, Email, Website and Comments. Choose from the drop down menu the type of comment each question requires: Name and Email use "text" comments, and Comments are "paragraph text." You can choose which questions are mandatory(required).
  • Preview the form by clicking the link at the bottom.


Step 2: Get the html code

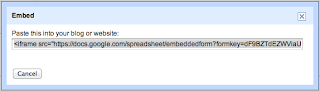
After you are satisfied, save and go to More Actions --> Embed.  Google will show you an html code to copy. Mine looks like this:

Step 3: Create Your Contact Page on Blogger
  • Go to your "Contact Me" page (or create one) on your blog. (Go to Posting --> Edit Pages). Open the "Edit HTML" tab and paste the code from Google Docs.
  • Preview how it will look on your blog. I had to adjust the width of the form to 600 pixels (In the code, you will see that Google Docs sets it at width="760." Fiddle with the number until the form fits within your page width).
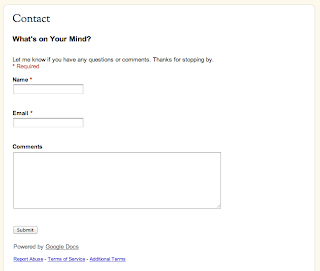
  • Publish. My contact form looks like this:

Step 4: Make Sure You are Notified When Someone Uses the Form

When someone fills out the contact form, the information will go into the spreadsheet on your Google Docs form. Turn on email notification:
  • Go back to Google Docs and click on your form. A spreadsheet will open. Click Tools --> Notification Rules.
  • Check the box "a user submits a form" and "email-right away." Save.     You have done.
Read More »

how to show my image with my post on google ~ mkniit ~ gniitsolution ~ gniit solution

You might have noticed that some of the results in google search display author’s profile picture with Google Plus ID along with their posts.
Why Implement Google Authorship?
  • Facial images are very eye-catching
  • Google will promote your content over stolen versions
  • You will begin to build AuthorRank with Google
I’m going  to explain you about how you can show your picture in google search result whenever your website is listed in search result. Just follow the steps what i have mentioned. But before doing so I would like to let you know about who can do this ? A website owner or blogger or even an article writer can show their picture in google search result page. All you need to do is to follow these steps. But before that I would also like to let you know about how your picture will show in google search result page. Here i have mentioned myself in google search result while searching my article on google.


This is same how your picture will look after you will do all the thing I’m going to tell you. Okay what you need to do is to follow these steps.

NOTE: You must have a Google Plus account to begin with tutorial and if you already don't have Google+ account, you can make one for free by visiting http://plus.google.com.

  1. Go to http://profiles.google.com and click “Create my profile”
  2. Sign in with your Google account. (If you don’t have one, go to https://accounts.google.com/NewAccount)
  3. Fill out your profile as completely as you like. For our purposes here, you must include a profile photo (use the same one you use on your blog). This should be a clear headshot.
  4. Google recommends making the +1 page of your profile public. That page displays anything that you have publicly “+1ed” on the web. I’m not sure what this has to do with author verification, but they recommend it so I’d do it. While in edit mode on your profile, click the +1 tab and check the box “show this tab on your profile.”
Step  1 :  Just Create an “about me” or “any page viewing you information”  on you blog and link that page to your google profile.
Step 2  : This is important. While creating the hyperlink to your Google  Plus Profile page, Please remember to add rel=”me” to the link. as shown below.
<a href="https://profiles.google.com/your_ID" rel="me">My Profile</a>
Step 3:  In this step you must ensure that the blog articles you have written have a link to your “about me ” page.
This hyperlink should have the rel=”author” attribute as shown below.
<a href="http://yourwebsite.com/about/" rel="author">My short bio</a>
Step 4: This is the last step. Sign in to your Google Profiles account and and add a new custom link that points to your “About Me” page. Tick the option that says “This page is specifically about me” and save the changes. You are almost done.  wait when google will crawl you website again and your picture will show on google search result page.

NOTE: Google takes sometime to show these images. It can vary from person to person, so keep patience.
Read More »